The gap between a Lumion draft render and a client-ready image is almost entirely in the settings.
Default Styles get a scene partway there, but they apply the same values to every project. An exterior residential scene and an open-plan office interior have different lighting needs, yet a preset treats them the same.
This guide covers the specific Lumion render settings that close that gap: ray tracing, enhancer, materials, lighting, color correction, plus separate interior and exterior breakdowns with values you can dial in today.
Note: Lumion 2026 uses the same render pipeline and effects stack as Lumion 2025. The settings in this guide apply to both versions.
Lumion's built-in Styles (Realistic, Interior, etc.) are a solid starting point. The common effects they bundle into a one-click stack do save some time during early design stages.
But one-click solutions rarely transfer well between projects. A preset applies the same values regardless of scene type, and you end up with overexposed windows, flat shadows, or materials that don't look like what they represent.
That's why, to learn how to make a realistic render in Lumion, you need to move beyond presets and start controlling each layer of the effects stack yourself.
Once you find settings that work, you can save them as a custom FX stack and reuse them across projects.
In Lumion, realistic render settings include the Ray Tracing effect, and that should be the first thing you enable. It's under +FX in Photo or Movie Mode, where it replaces several older parameters with far more accuracy:
Out of all the Lumion render settings, this is the one that makes the biggest visual difference:
.avif)
Starting with Lumion 2025, you can also preview all that live in the viewport before making the final render.
The effect comes with four preconfigured quality levels that adjust Samples and Bounces automatically:
Which preset for your GPU: an RTX 4060 or equivalent handles Medium and High at reasonable times for stills. An RTX 4070 or 4080 runs High and Ultra comfortably. Cards below the RTX 3060 level will struggle with ray tracing at any preset. Check your card's RTX capability before enabling the effect.
For final still images, Lumion's support documentation recommends 256 to 512 samples as a balanced range (find the pre-test at 3.8) that keeps render times reasonable with no noticeable noise. The maximum of 2048 is not a must unless you're rendering scenes with very complex indirect lighting.
A note about bounces
Bounces control how many times light ricochets off surfaces. More bounces will produce softer, more natural ambient light, but at the cost of a longer render time.
Go carefully with these because if your scene's lighting is too dim some items might become blotchy. If you notice patchy walls or uneven shadows, try increasing Samples first. If that doesn't fix it, lowering Bounces to 4–6 should clear things up.
Lumion includes a built-in Denoiser that smooths out the graininess ray tracing produces at lower sample counts. It runs automatically during final renders. For interiors with complex indirect lighting, the Denoiser lets you render at 256 samples instead of 1024 and still get clean results, cutting render time by 60-70% with minimal quality loss.
.avif)
Lumion 2025 added AI-based image upscaling. It renders at half your target resolution, then uses CPU-side AI to upscale to full size. This lets you produce 8K ray-traced stills without the GPU memory or render time that native 8K requires. The quality difference is minimal for most architectural scenes.
.avif)
Enable this toggle for scenes with complex glass geometry like skylights or decorative jars. It lets glass cast proper shadows and interact with Depth of Field. For simple flat surfaces (e.g., windows) check whether leaving it off makes any visible difference; usually it doesn't, so no need to increase render times.
However perfectly lit, the scene still looks fake if materials don't respond to light correctly. What you need here is Lumion's Material Editor, which uses a full PBR (Physically Based Rendering) pipeline with a Metalness/Roughness workflow. This is another one of the most impactful areas to tweak in your Lumion render settings.
Use these sliders:
.avif)
The Weathering slider at the bottom of the editor adds age and imperfection (dirt, worn edges, moss, rust, etc.) using built-in presets.
Lumion's official material guide notes that even subtle weathering makes a noticeable difference in realism.
.avif)
Lumion's real-world measurement system helps with wrongly scaled textures.
You can have detailed models and perfect materials, but poor Lumion lighting settings will still flatten everything into a dull image. Lumion separates light into two systems: natural (sun and sky) and artificial (spotlights, omnilights, area lights).
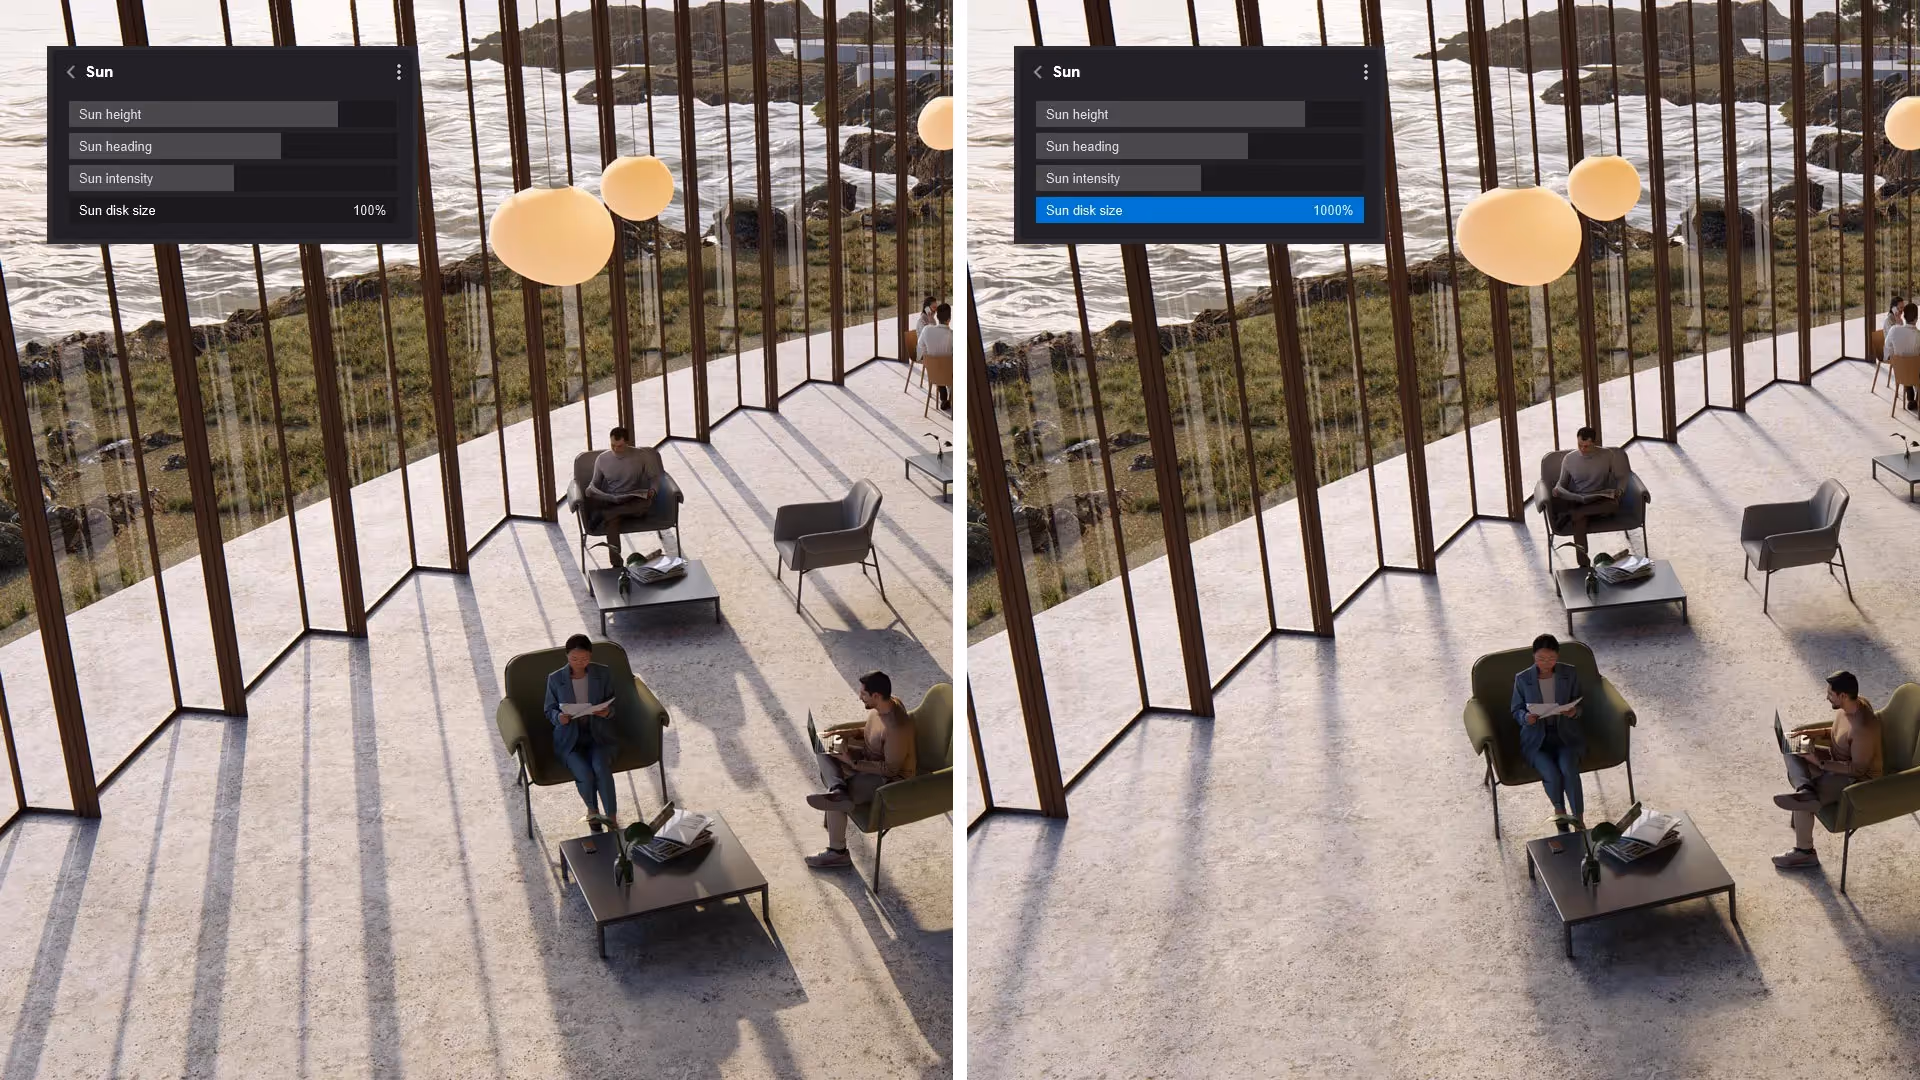
Control the sun's position through the Sun effect or the Real Skies effect in Photo Mode.
Lumion offers Spotlights, Omnilights, and Area Lights. Brightness is measured in Lumens (for Spotlights and Omnilights) and Nits (for Area Lights and Emissive materials). Go slowly, don't add too many lights or set their combined brightness too high in ray-traced renders. That often causes blotchy, patchy-colored walls and uneven shadows, especially in enclosed interior scenes.
The fix is usually one of these:
A helpful benchmark from Lumion's knowledge base is roughly 20 Lumens per square foot for a well-lit room. So a 9' × 12' bedroom needs about 2,160 Lumens total across all fixtures.
.avif)
Any surface can emit light if you set its Emissiveness value in the material editor. This is useful for TV screens, neon signs, LED features, and backlit panels. Just don't forget they add to the total brightness; factor that in when balancing your artificial Lumion lighting settings.
The Color Correction effect is where you fine-tune the final look of your image, like a built-in Lightroom.
.avif)
Lumion runs an auto-exposure function by default. For consistency across multiple camera views in the same project, consider disabling it.
Setting the Exposure slider manually to prevent shifting brightness every time you rotate the camera, which users highlight as a common frustration when batch-rendering a set of views.
You can toggle auto-exposure off inside the Color Correction effect.
Temperature shifts the entire image warmer or cooler. E.g., for a warm interior atmosphere, push it slightly toward amber; if you're rendering a crisp modern exterior, keep it neutral or slightly cool.
Tint adjusts the green-magenta balance and is usually best left close to zero unless you're correcting for a specific sky color.
Interior scenes involve light that enters through windows and doors bounces multiple times before it reaches corners. On top of that, artificial fixtures need to stay visible even when the sun is strong outside.
.avif)
Here's how to approach Lumion interior render settings specifically.
Enable Ray Tracing. It's where interiors benefit the most, because accurate light bounces fill rooms naturally. Lumion's own setup guide recommends beginning with Real Skies and Color Correction as your base effects, then adding in the Ray Tracing effect on top.
Adjust the Sky Brightness under Real Skies to control how much ambient daylight fills the room through windows. Then layer in your artificial lights and fine-tune their Lumen values. Get the lighting balance right before touching Color Correction, it's much less hassle to tweak exposure and highlights once your light sources are set.
For translucent materials like curtains or lampshades, increase the Subsurface Scattering value in the material editor. It lets light penetrate and scatter through the fabric.
Exteriors lean heavily on sky conditions and environmental context.
For atmospheric depth, add subtle fog. It separates foreground elements from the background the way atmospheric perspective does in real photography.
.avif)
Once you've dialed in the best Lumion render settings for a project, save your FX stack so you can reuse it. In Photo Mode, you can save your effects configuration as a custom FX stack (.LME file), which stores every effect and its values.
The Master Effects List has been available since Lumion 2023. Any effect you add to the Master list applies automatically to every Photo slot in your project. Change a value once, and it updates everywhere. This is useful for Color Correction and Ray Tracing settings that should stay consistent across all views.
You can also use Lumion's built-in Styles as starting points. Apply a Style, then open the effects stack and modify individual settings to suit your scene. The Lumion render presets built into Styles cover common scenarios (Realistic, Interior RT, Exterior, etc.), but they always benefit from scene-specific adjustments.
.avif)
If you want to push your Lumion renders further in post-processing, MyArchitectAI's Lumion AI enhancer comes in.
MyArchitectAI is an AI-powered rendering tool that takes your finished Lumion renders and refines them: less noise, sharper textures, better lighting, more realistic figures. Upload your render, set a creativity slider, and get back an enhanced version in seconds. No Photoshop needed.
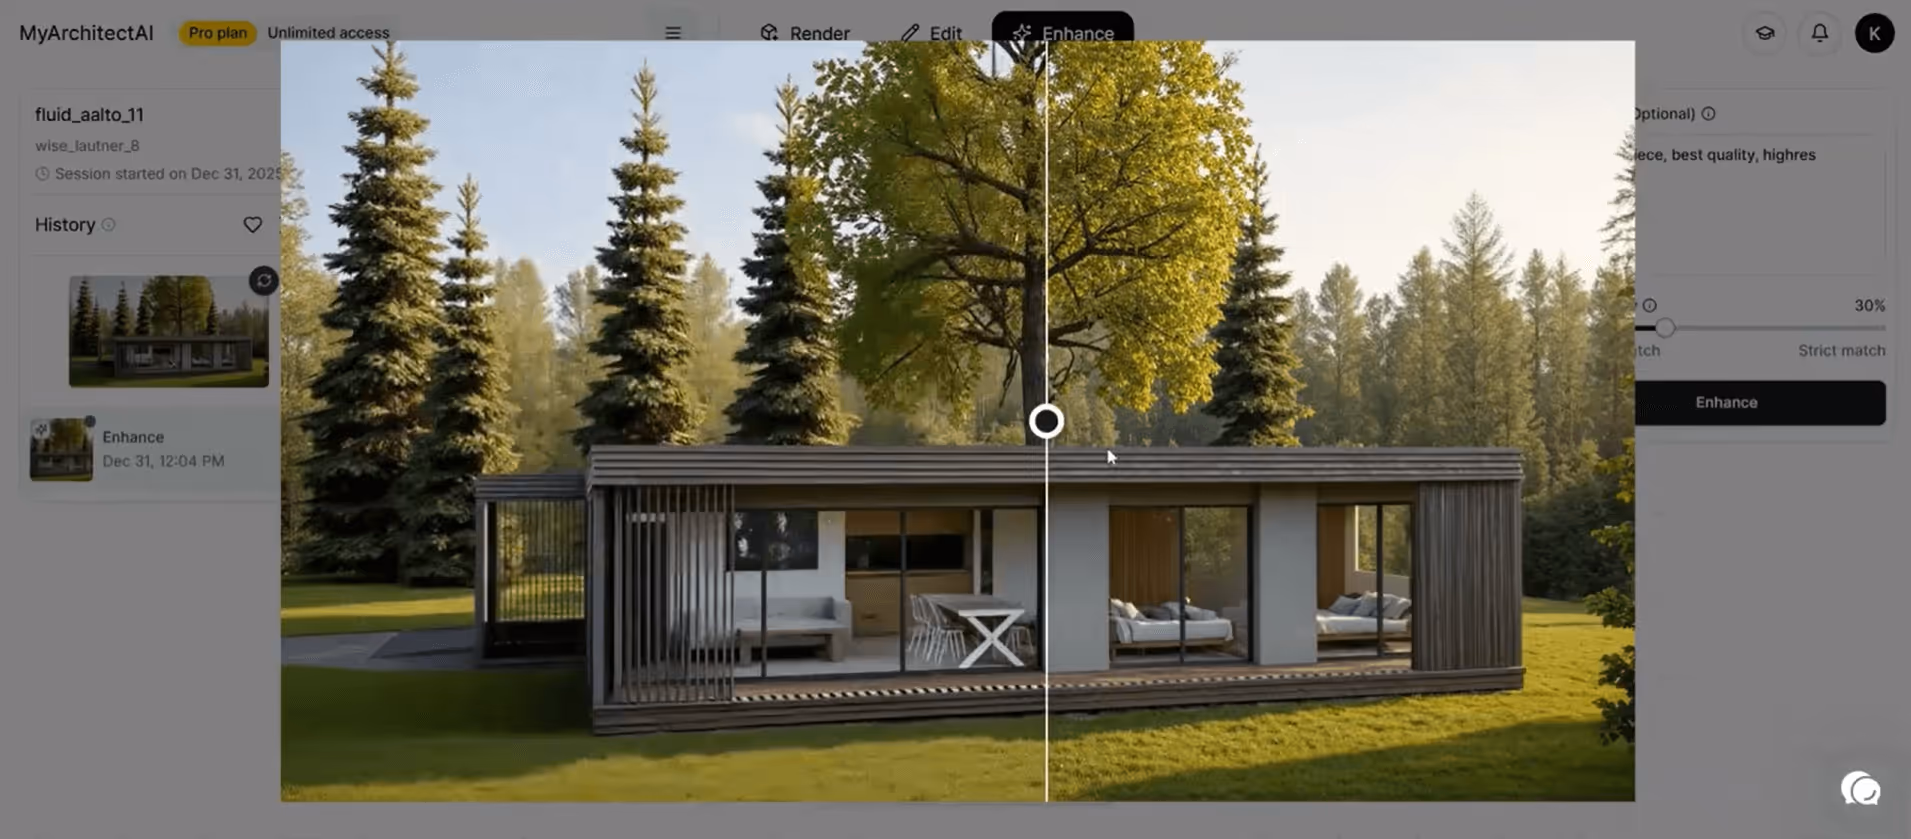
It also works as a standalone renderer. If you want to skip the hardware demands and long render times that come with realistic rendering in Lumion altogether, you can upload a screenshot or export of your model directly to MyArchitectAI. It will produce a photorealistic result in under 10 seconds, entirely in the cloud, on any device including Macs.
Try it out with 10 free renders here.
The biggest improvements come from enabling Ray Tracing, using PBR materials with proper Roughness and Reflectivity values, and manually controlling exposure through the Color Correction effect. Adding weathering to surfaces and populating scenes with high-quality assets from Lumion's library also makes a difference. Realistic results in Lumion come from stacking these adjustments: ray tracing first, then materials, then lighting, then color correction.
Start with one of Lumion's built-in Styles (like Interior RT or Realistic) as a base, then gradually adjust individual effects. Focus on Ray Tracing quality (Medium or High is fine for learning), Color Correction (especially Exposure and Temperature), and material Roughness values. Save your adjusted settings as a custom FX stack so you can build on them over time.
Ray tracing was introduced in Lumion 2023 and requires an RTX-capable graphics card. It's available in both Lumion Pro and Lumion Studio. Older versions use the Rasterization pipeline, which relies on separate Skylight, Shadow, Reflection, and Hyperlight effects to approximate similar results, though the quality ceiling is lower.
An NVIDIA RTX card (RTX 20 series or newer). An RTX 4060 handles Medium and High presets for stills. An RTX 4070 or higher is better for Ultra presets and animation rendering. AMD cards don't support Lumion's ray tracing implementation.
Check our rendering GPUs guide for some of the best options on the market.
Render time varies with quality preset, resolution, scene complexity, and GPU. A 4K still at High preset (256 samples) typically takes 5-10 minutes on an RTX 4070. Ultra preset (1024 samples) can take 20-40 minutes for the same scene. The AI upscaler in Lumion 2025+ cuts this by rendering at half resolution first.
For client presentations and portfolio images, 3840x2160 (4K) is the standard. For print (A3 boards), render at 5K or higher. For quick internal reviews, 1920x1080 is enough. Lumion's AI upscaling can render at 1920x1080 and upscale to 4K with good results.
Increase the ray tracing sample count. 256 samples eliminates most visible noise. Lumion's built-in Denoiser also smooths remaining grain automatically. If you still see noise at 256 samples, check for very dim artificial lights or excessive bounces. Both can cause patchy artifacts.

.webp)