Rendering is where a flat Blender model turns into a photorealistic still, and it’s also where most beginners get stuck: grainy images, pitch-black frames, renders that crawl for hours. This guide shows you how to render in Blender from start to finish for clean, realistic results.
You’ll set up your lighting and camera, dial in the render settings that actually matter, export the final image, and fix the problems that trip people up along the way. We’ll focus on architectural renders and assume your model is already built.
Creating a render is similar to taking a photograph in real life. You find the best view, make sure the subjects are within the frame, and that they’re properly lit for visibility and mood.
When you render, you’re doing the same.
Before you start learning how to start rendering in Blender, these are the two most essential steps in the pre-rendering process in Blender you should know: camera and lighting. Learning a few Blender keyboard shortcuts will speed up everything that follows.
Since this is a rendering guide, we’ll assume that you’re already done creating your architectural model in Blender and now you’re ready to move on with rendering.
Lighting adds realism to your scene. Even with realistic textures and materials, without light, you just have a plain 3D model.
To add lighting, press Shift + A (Add), select Light, then choose your preferred light type.
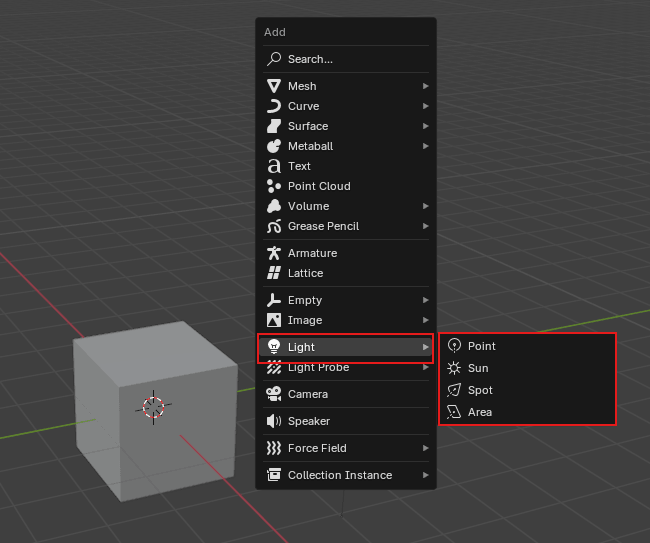
In Blender, lighting is straightforward. You have a choice between 4 basic types of lighting, namely:
Beyond the four light objects, you can light an entire scene with the World settings. Adding an HDRI (a 360° environment image) to the World shader wraps your model in realistic ambient light and reflections, which is the fastest way to get natural daylight into an architectural exterior or a softly lit interior.
To set it up, go to the World Properties tab, click the dot next to Color, and choose Environment Texture. Open your HDRI file, then switch to Rendered view to see it light the scene. You can rotate the environment with a Mapping node in the World shader to position the sun and adjust the mood. Use an HDRI on its own for even, realistic lighting, or combine it with a Sun light when you need sharper, directional shadows.
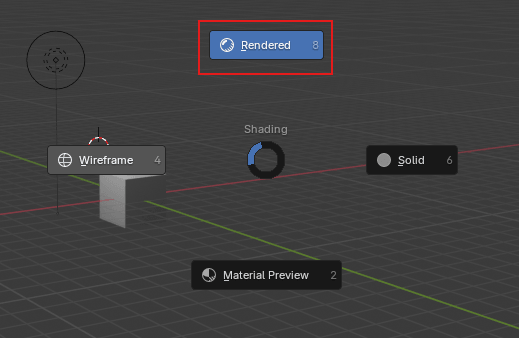
Open the Viewport Shading Pie Menu by pressing Z, then select Rendered or press 8. This will toggle Rendered view mode for interactive rendering.
In this mode, you’ll be able to make changes to your scene as it is rendered in real-time.
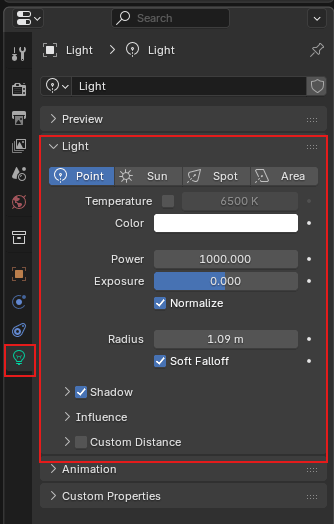
After adding in the lights, you can check if they’re functioning properly in Rendered view mode. If you think they are too dim or are too bright, this will be the perfect time to adjust their settings: power, radius, color, temperature, and max bounces.
To access light settings, select a light in your scene, then click the Object Data Properties icon in the Properties tab.
Once you’re satisfied with your lighting, it’s time to set up your camera to finalize your render view.
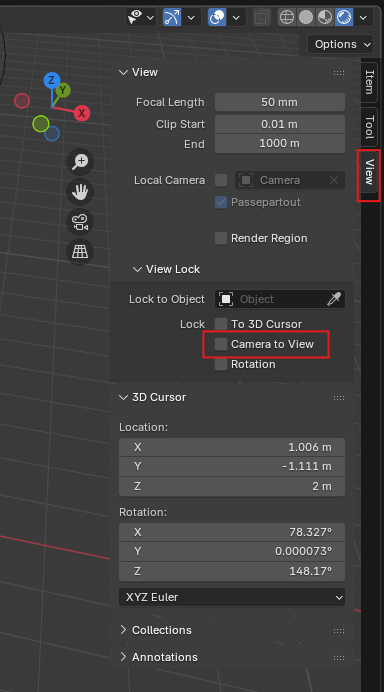
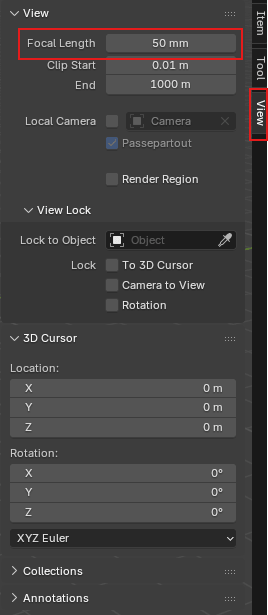
Tip: For interiors and even exteriors, if you find it hard to locate an angle where you can frame all important aspects of your scene, you can adjust the focal length. This is very helpful for architectural stills, especially for interiors. Lower focal length creates a wider view.
After modeling, adding lighting, and positioning the camera, you can jump straight to rendering, but you’ll be limited to the default render settings. For basic scenes, they can be enough, but rarely optimal. Optimizing your render settings generally improves the quality of your render – lighting, resolution, camera, textures, samples, noise threshold, etc.
Some workflows use AI-based renderers like MyArchitectAI to handle these steps automatically. Instead of manually configuring lighting, materials, and render settings, the tool generates a fully rendered image based on your input. Because this process runs on external hardware, it doesn’t rely on your local machine and can produce results in under 30 seconds. This makes it useful for quick visualizations, early-stage concepts, or when you need fast turnaround times.
That said, Blender remains a top choice if you’re comfortable spending more time setting up and fine-tuning your renders for greater control and flexibility.
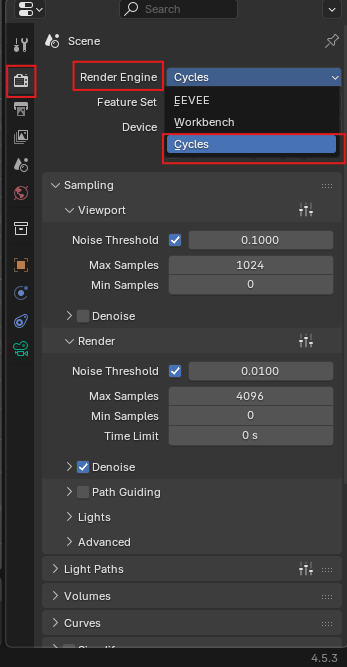
Render settings will differ depending on the render engine you’ve chosen to use. Blender offers three options: EEVEE, Workbench and Cycles, but in this guide, we’ll be talking about Cycles only, as this is what’s commonly used for final renders. EEVEE is mostly used for drafts and real-time walkthroughs.
To choose your Render Engine, click the Render Properties icon in the Properties Tab.
Blender offers three render engines, namely:
For architectural still renders, Cycles is recommended because it produces more realistic lighting, shadows, and reflections. It is also the most widely used render engine in Blender, which is why we’ll be using it for this guide.
Optimizing the settings below allows you to control render quality, reduce noise, and manage render time based on your needs.
You’ll find two drop-downs under Sampling, namely Viewport and Render. Viewport settings will only affect what you see in rendered view mode, while Render settings control how your actual render will look.
Therefore, it’s recommended to keep the Viewport settings at a lower quality to allow faster real-time rendering in render view mode.
Choose between GPU and CPU as your compute device. In Cycles, both use the same path tracer and produce near-identical results, so this is a speed-and-memory decision, not a quality one. GPU rendering is faster for most scenes, while CPU rendering can handle very large scenes that won’t fit in your GPU’s VRAM. If you have a supported GPU, use it, and fall back to CPU only when you run out of video memory. If you're in the market for a graphics card, check our rendering GPU guide.
Cycles samples your scene over and over as it progressively increases the quality of your render. The render engine stops processing your scene as soon as it reaches the maximum number of samples or until it reaches your preferred level of noise (noise threshold), whichever comes first.
Typical values range from 0.1 to 0.0001. This tells Cycles how much noise to allow in the final render. The lower the value, the higher the quality, but the longer the render time. If disabled, Cycles will continuously sample your scene until it reaches the indicated max samples.
Cycles renders your image by sampling each pixel multiple times to determine its final color. Some pixels resolve quickly, while others, especially those with complex lighting, require more samples. The Max Samples setting acts as a cap, limiting how many times each pixel is sampled to prevent unwanted long render times.
Note: Keep Viewport Samples low for faster previews. For Render Samples, there’s no fixed number. It depends on your scene. As a general rule, use higher samples for darker or more complex scenes, and lower samples for bright, well-lit scenes. A good starting point is around 500 samples for well-lit scenes and 1000 samples for darker scenes, then increase if needed. In most cases, 4096 samples is already considered high.
Pro tip: Don’t aim for the highest possible quality by simply increasing samples and lowering the noise threshold. This significantly increases render time and doesn’t always result in noticeable improvements. Instead, use Blender’s built-in denoiser or a third-party AI denoising tool to clean up your render efficiently.
Denoising reduces noise without requiring additional samples, helping you achieve cleaner results in less time. This makes it especially useful when you want to avoid long render times while maintaining good image quality. Denoising can be enabled for both the Viewport and the final Render.
In some workflows, external enhancers like MyArchitectAI are also used to achieve clean, high-quality outputs without relying heavily on high sample counts and long render times.
Before rendering, you need to define how your final image will be saved.
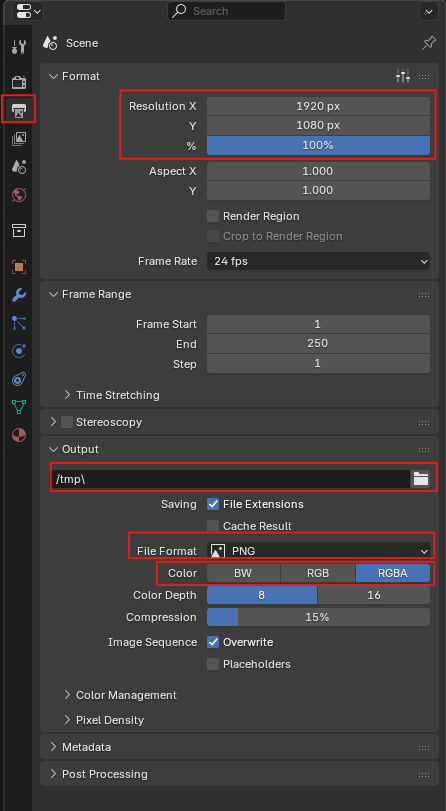
Go to the Output Properties tab to adjust the following key settings:
Set your render resolution under Resolution X and Y. Higher resolutions produce sharper images but increase render time.
Common values:
Choose the format of your final image:
For most architectural renders, PNG is recommended.
Set this to RGB for standard images, or RGBA if you need a transparent background.
Choose where your rendered image will be saved by setting the File Path.
Press F12 or click Render > Render Image to start the render. Blender immediately starts rendering your scene with the current setup.
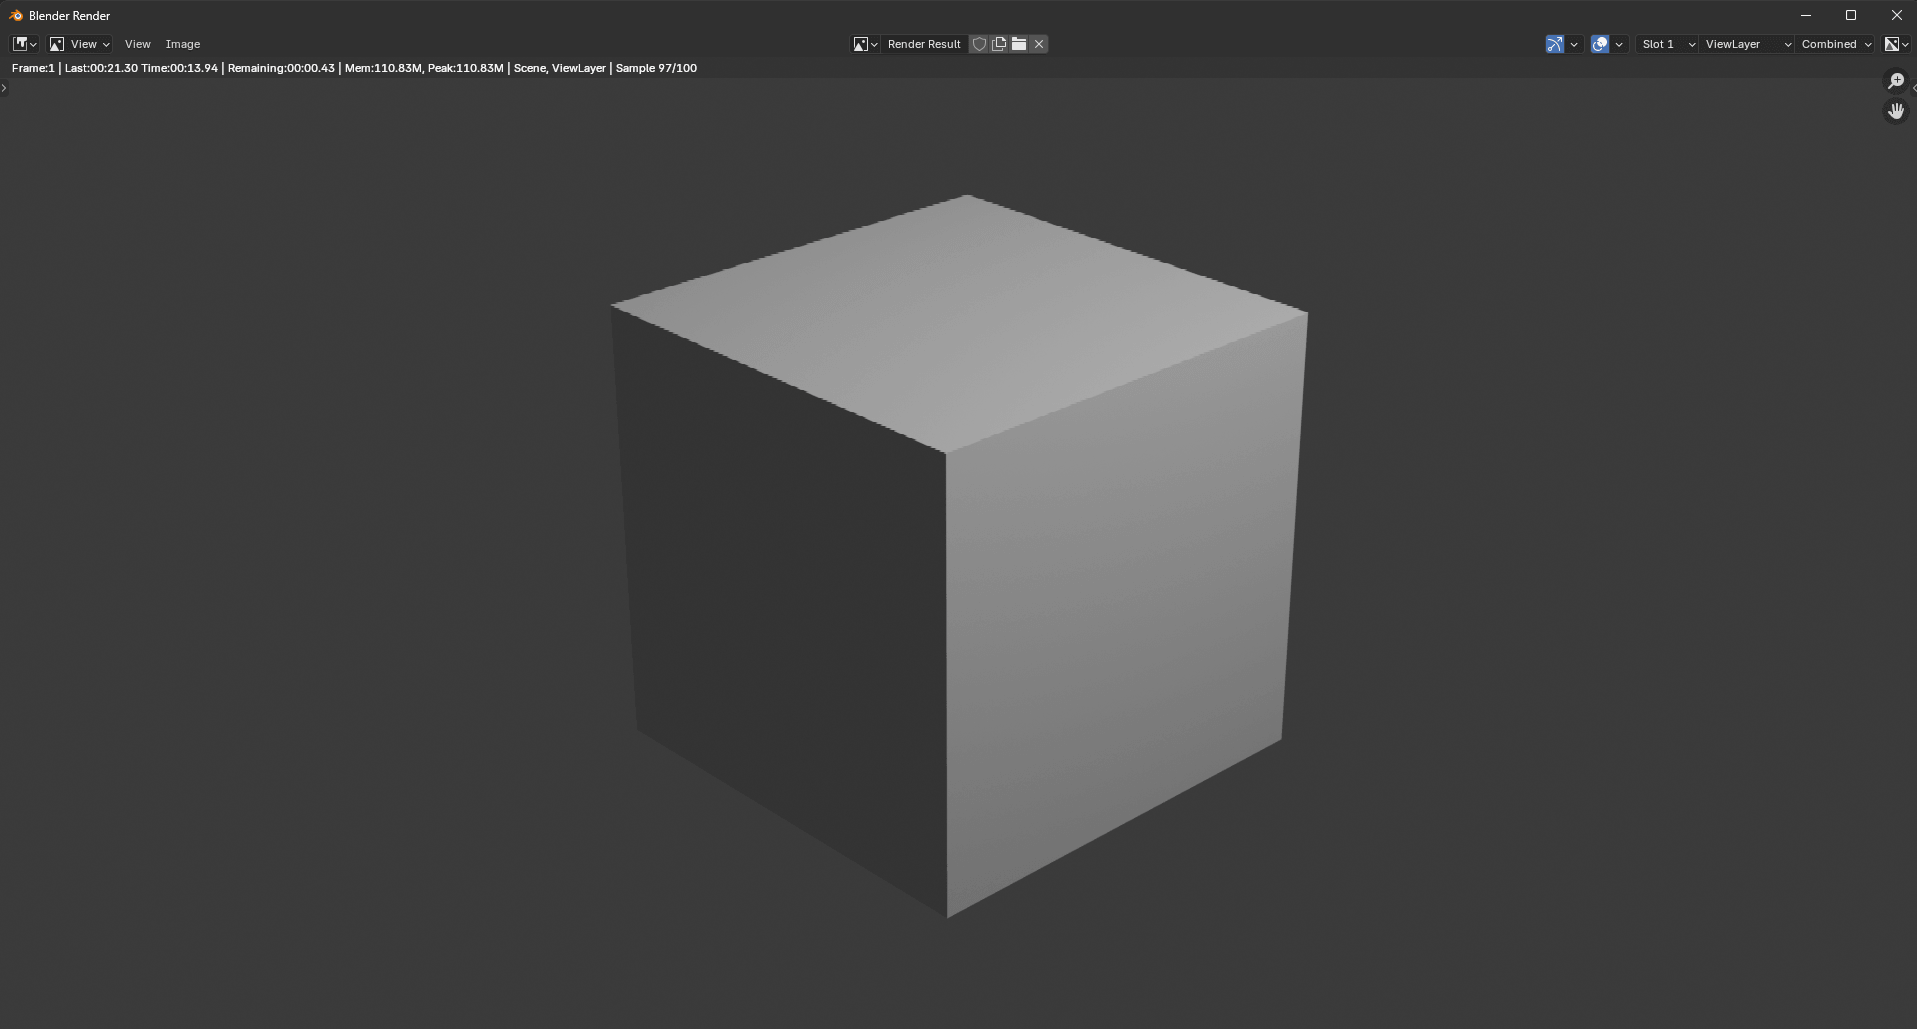
When you start your render, Blender will start sampling your scene immediately. Max samples will be displayed in the Status Bar of the Render window. You’ll see the render visually improve as more samples are finished.
To cancel the render, press Esc or close the render window. There are no confirmation prompts, so the render will stop instantly.
Render time will depend on the complexity of your scene, max samples, and noise threshold. Once the render starts, you’ll see a running time in the status bar, which is an estimate of your render. Basic scenes can take seconds to a few minutes, while complex scenes can take hours.
Once the maximum samples are met or the required quality is satisfied, the render will stop. At this point, review your image for:
If you notice any issues, adjust your settings or scene and render again. If everything looks good, proceed to saving your image and proceed to the next step.
Once the render is finished, click Image > Save/Save As to save your render.
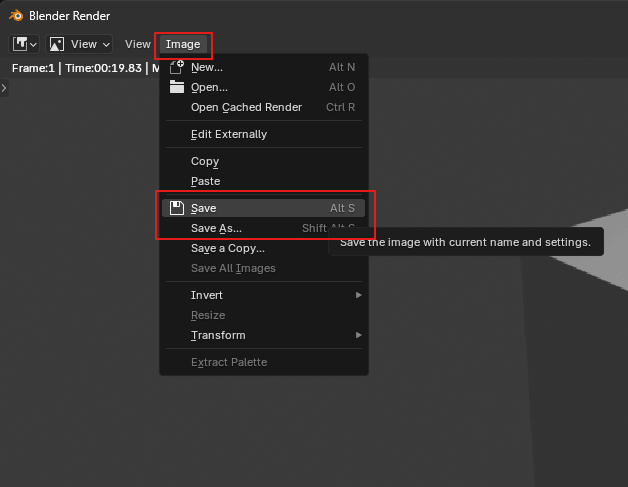
The Blender File Browser will appear after clicking Save/Save As.
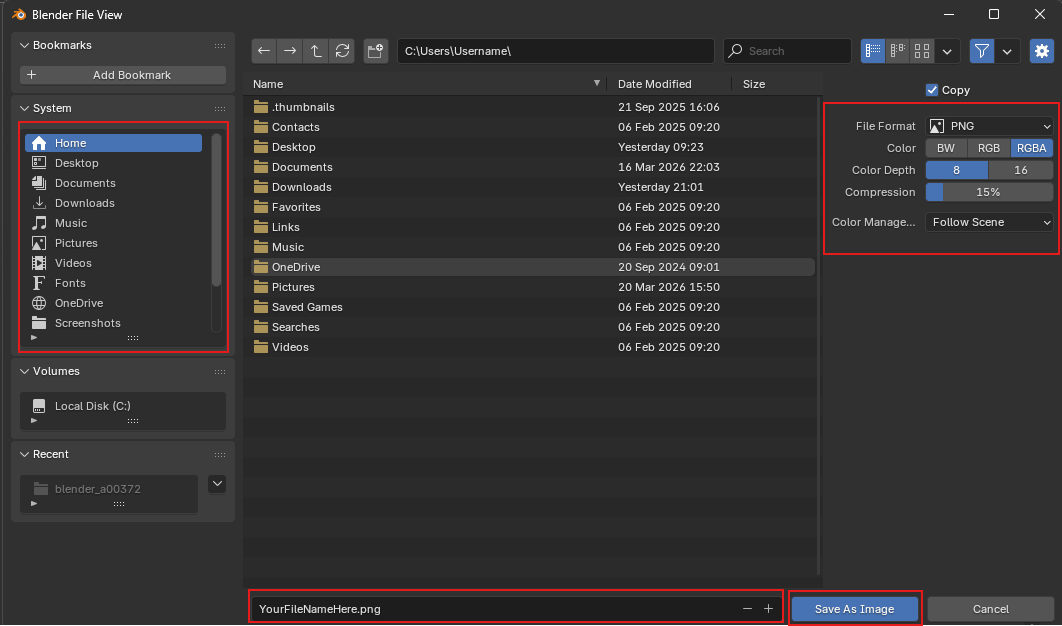
On the left, choose the folder where you want to save your render. On the right, review your file settings such as File Format, Color, Color Depth, and Compression. These settings are the same ones you configured in Step 5: Output Properties, but it’s still good practice to double-check them before saving.
Once everything is set, click Save As Image.
This is a crucial step you shouldn’t miss. Blender does not automatically save finished renders. If you close the render window, exit Blender, or start a new render, your image will be lost.
While there are workarounds like using output nodes, these are more advanced and not needed for basic still renders. In most cases, manually saving your image is the simplest and most reliable approach.
More samples mean more quality, but improvements follow diminishing returns, which means that at a certain point, increasing the number of samples will result in smaller quality improvements that are less noticeable.
Instead of increasing your samples to reach your target quality, you can use Blender’s built-in denoiser which will improve the quality of your image after rendering. Or, you can use a third-party denoiser or image enhancement tool for post-processing.
Proper placement of the camera and the right use of its settings can elevate the look of your render beyond materials, textures, lighting, and optimized settings. Don’t just place the camera and point it to frame your scene, but make the most out of the available camera settings.
Adjust the Focal Length to control how wide or zoomed-in your view is, especially for interiors where space is limited. Enable Depth of Field to add subtle background blur and create focus on key elements. You can also tweak camera height and angle to avoid distortion and achieve more natural, eye-level perspectives.
Lighting that is too strong can cause overexposed areas, while insufficient lighting results in dark, flat, and noisy renders. Balance your light sources by adjusting intensity, placement, and size. Use Rendered view to preview lighting early and avoid surprises in the final render.
No matter how high your render settings are, if your resolution is too low, the final image will look soft or pixelated. On the other hand, setting the resolution too high can lead to unnecessarily long render times. Always check your resolution before rendering. For standard use, 1920 × 1080 is a good starting point. For higher-quality outputs, you can use 3840 × 2160 (4K) or higher, depending on your needs.
Rendered view gives you a near real-time preview of how your final image will look as you adjust lighting, materials, and textures. Using this mode reduces guesswork and allows you to catch issues early before starting a full render. For faster previews, keep Viewport Samples low, use a higher Noise Threshold, and enable Viewport Denoising. This keeps your preview responsive while still giving you a clear idea of the final result.
Noise appears as speckled white dots on your render, mostly in shaded spots or places illuminated by complex lighting.
If you see noise in your finished renders, it may be because of:
Adjust sampling, noise threshold, then turn on the denoiser. If this doesn’t fix it, check your lighting setup, then repeat the process.
If you’re getting a pitch-black image after ensuring you have a proper lighting setup, a good balance between max samples and noise threshold, and your render settings are properly optimized as recommended above, it may be because of the following reasons:
Slow rendering is one of the most common issues in Blender. In some cases, even simple scenes can take longer than expected, which usually indicates inefficient settings or setup issues. This is the reality for most traditional renderers, unlike cloud rendering tools that don’t render on your local hardware and are naturally faster.
Slow rendering may be caused by:
In some cases, slow rendering is simply part of the process. High-quality scenes may require higher samples, larger resolutions, complex lighting, and even CPU rendering due to hardware limitations. When all these factors are necessary, render times can take hours or even days, and there may be little you can do to significantly reduce them without sacrificing quality. This is one of the main limitations of traditional rendering workflows.
In these situations, the best approach is to work smarter around the bottleneck. You can use render previews to finalize your scene before committing to a full render, render in passes or regions, or use denoisers and external tools like MyArchitectAI that can produce high-quality renders in less time.
Once a render is finished, in the Render Window, click Render > Save/Save As. The Blender File View Window will pop up, prompting you to select a folder, change the file name, and make sure the file format, color, color depth, and compression settings are correct. Once the necessary changes have been made, click Save As Image.
Switch to GPU rendering, use fewer samples, and enable a denoiser. These three alone can significantly reduce render time without heavily affecting quality. Make sure your hardware can handle it first.
Pressing F12 starts the render process using your current render settings. Blender will then open the Render window and begin rendering your scene.
To render a transparent background in Blender, go to the Render Properties tab, then open the Film section and enable Transparent.
To make Blender use a GPU, in the Render Properties, with Cycles selected as your render engine, click the Device drop-down and select GPU compute.
To change Render Engine in Blender, go to Render Properties, click the Render Engine drop-down, and select your chosen engine (Cycles, Workbench, or EEVEE).

.webp)