Knowing how to render in Revit transforms your BIM models from technical drawings into compelling visuals that win projects.
Why is this important?
In case you don’t know it already, the gap between a basic Revit model and a photorealistic rendering can make or break your presentation. Professional renders help stakeholders visualize the final outcome and streamline decision-making. They also make it easier to catch design issues before anything goes public.
But here's the thing - rendering architectural projects has traditionally been a time-consuming process that requires specialized knowledge and expensive hardware. Not to mention hours of waiting for each image.
That's changing fast.
With modern rendering solutions, you can transform your Revit models into stunning visuals in seconds instead of hours. No more overnight render farms or complex material setups.
In this guide, we'll show you how to render in Revit using three different approaches - from the basic built-in renderer to blazing fast AI tools.
Your rendering approach depends on your specific needs.
But here’s the good news: You don't have to pick just one. Many firms use AI rendering for rapid prototyping and client reviews, then switch to physically-based rendering for final marketing materials.
Revit offers a native rendering engine, but that's just the starting point. Here are your options:
Here's how they stack up:
Let's go through each method so you can pick what works best for your workflow.
Revit comes with a basic rendering engine powered by Autodesk Raytracer. While it won't win any awards for speed or quality, it's already there and costs nothing extra.
Before we start, keep in mind that render dialogs in Revit evolve, and Autodesk doesn’t always maintain a consistent user interface for each version. But once you’re familiar with the process, navigating the interface discrepancies shouldn’t be a challenge.
So, here's how to render with Revit's native tools:
Open your Revit project and navigate to a 3D view. You can't render from 2D views, so make sure you're in either the default 3D view or create a custom one.
Position your camera where you want it. Use the ViewCube or SteeringWheels for precise navigation.
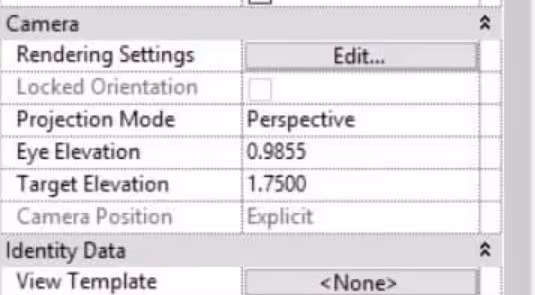
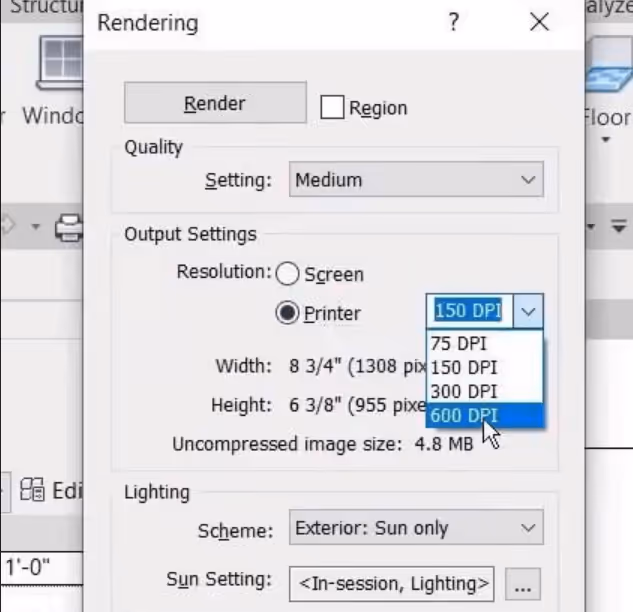
Click on the View tab in the ribbon, then find the Render button in the Presentation panel. This opens the Rendering dialog box on the left side of your screen. This is where you’ll find the tools to tune your best Revit render settings as required.
In the Rendering dialog, you'll see a Quality dropdown. Depending on the software version you’re working in, your options range from Draft to Best:
For initial tests, stick with Draft. You can always increase quality later.
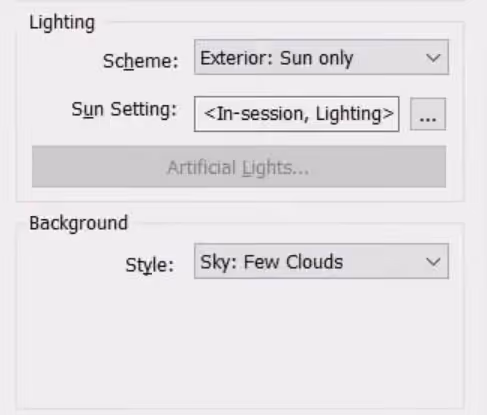
Under the Lighting section, choose your scheme:
Adjust the sun settings by clicking the three dots next to Sun Settings. You can set specific dates, times, and locations for accurate shadows.
Pick from Sky, Color, or Image for your background. For architectural exteriors, the Autodesk Sky option works well. For interiors, a simple color often looks cleaner.
Select your resolution from the Output Settings dropdown:
Higher resolutions mean longer render times, so to achieve higher quality, arm yourself with a lot of patience.
Hit the Render button and grab a coffee (or lunch?). Revit will show you a progress bar and estimated time remaining.
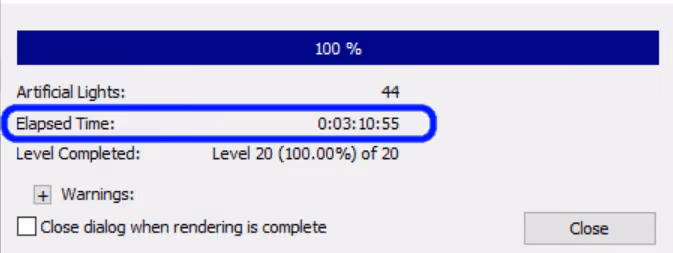
You can continue working in other views while rendering, but note that this may slow down your computer and extend the rendering time further. Make sure your workstation can handle the load.
Once complete, click Save to Project to store the image in your Revit file, or Export to save it as a JPEG or PNG.
Best Revit render settings
Here are the optimal settings for different scenarios:
Quick design reviews
Client presentations
Marketing materials
That's how to render in Revit using its built-in renderer. It gets the job done, but if you need better quality or faster results, you'll want to explore other options.
Modern times, modern tools. AI rendering completely changed the game for Revit visualization. Instead of waiting hours for a single image, you get photorealistic renders in 10-30 seconds.
The process is streamlined, often with zero learning curve. Export your view, upload it, and let AI handle the complex lighting and material calculations automatically. There’s no need to manually adjust hundreds of settings or worry about your hardware specs. AI rendering engines understand architectural contexts and automatically apply even atmospheric effects.
What’s more, AI renderers like MyArchitectAI work directly in your browser, meaning they're compatible with any device - whether you're on a high-end workstation or a basic laptop.
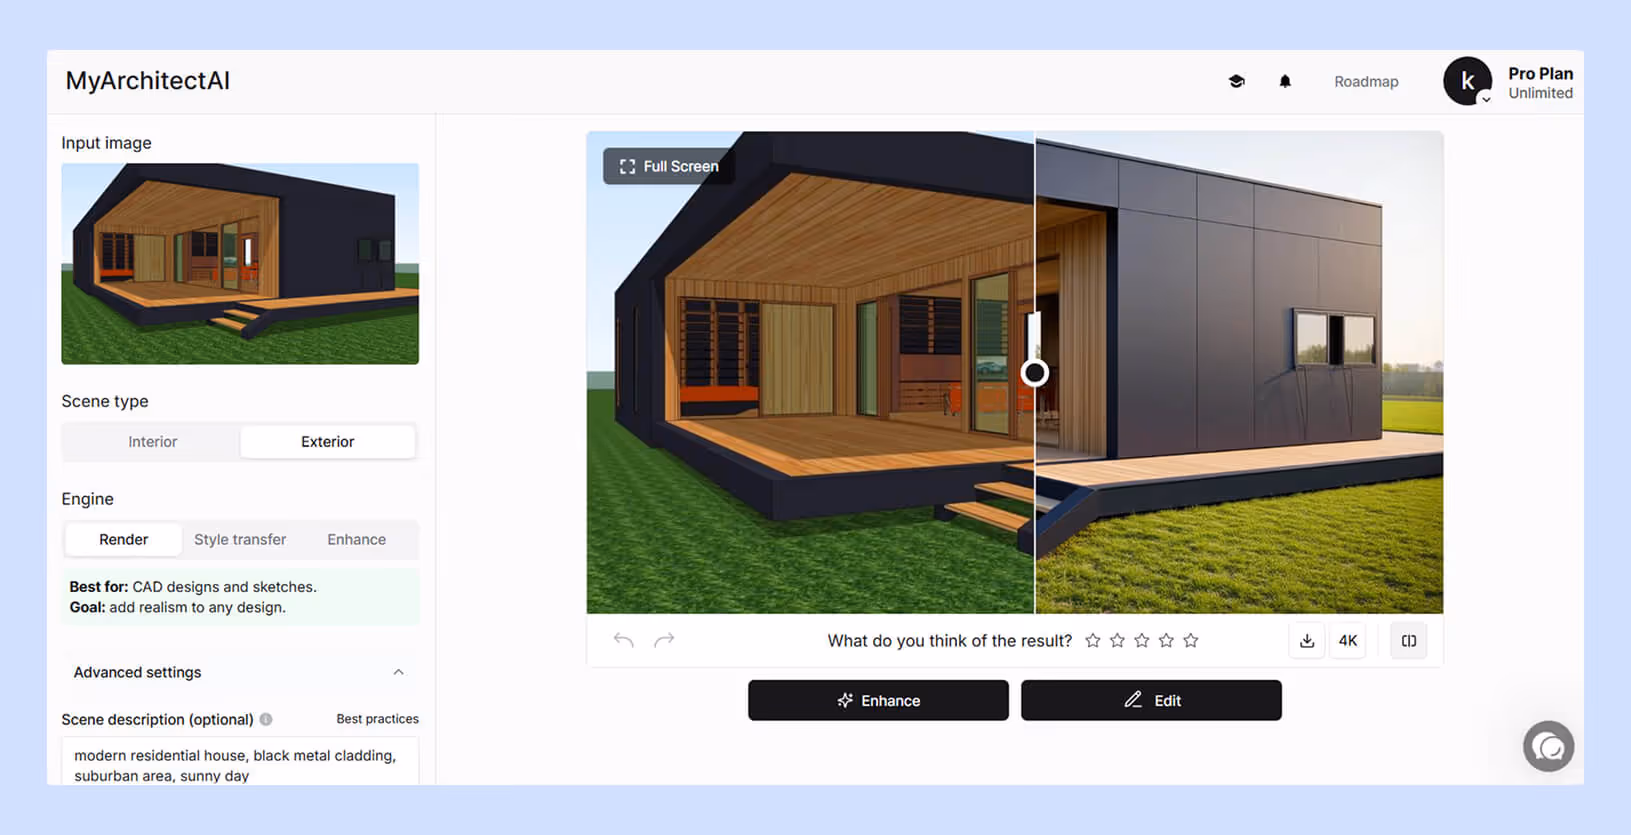
Rendering with MyArchitectAI
MyArchitectAI stands out as a lightning-fast architectural rendering tool. While Revit's built-in renderer leaves you waiting 30+ minutes for a decent image, MyArchitectAI delivers highly realistic results in just 10 seconds.
It’s ideal for architects and designers who need to explore “what-ifs” and prepare client-ready visuals quickly without the hassle of using traditional renderers.
Let’s walk through the process:
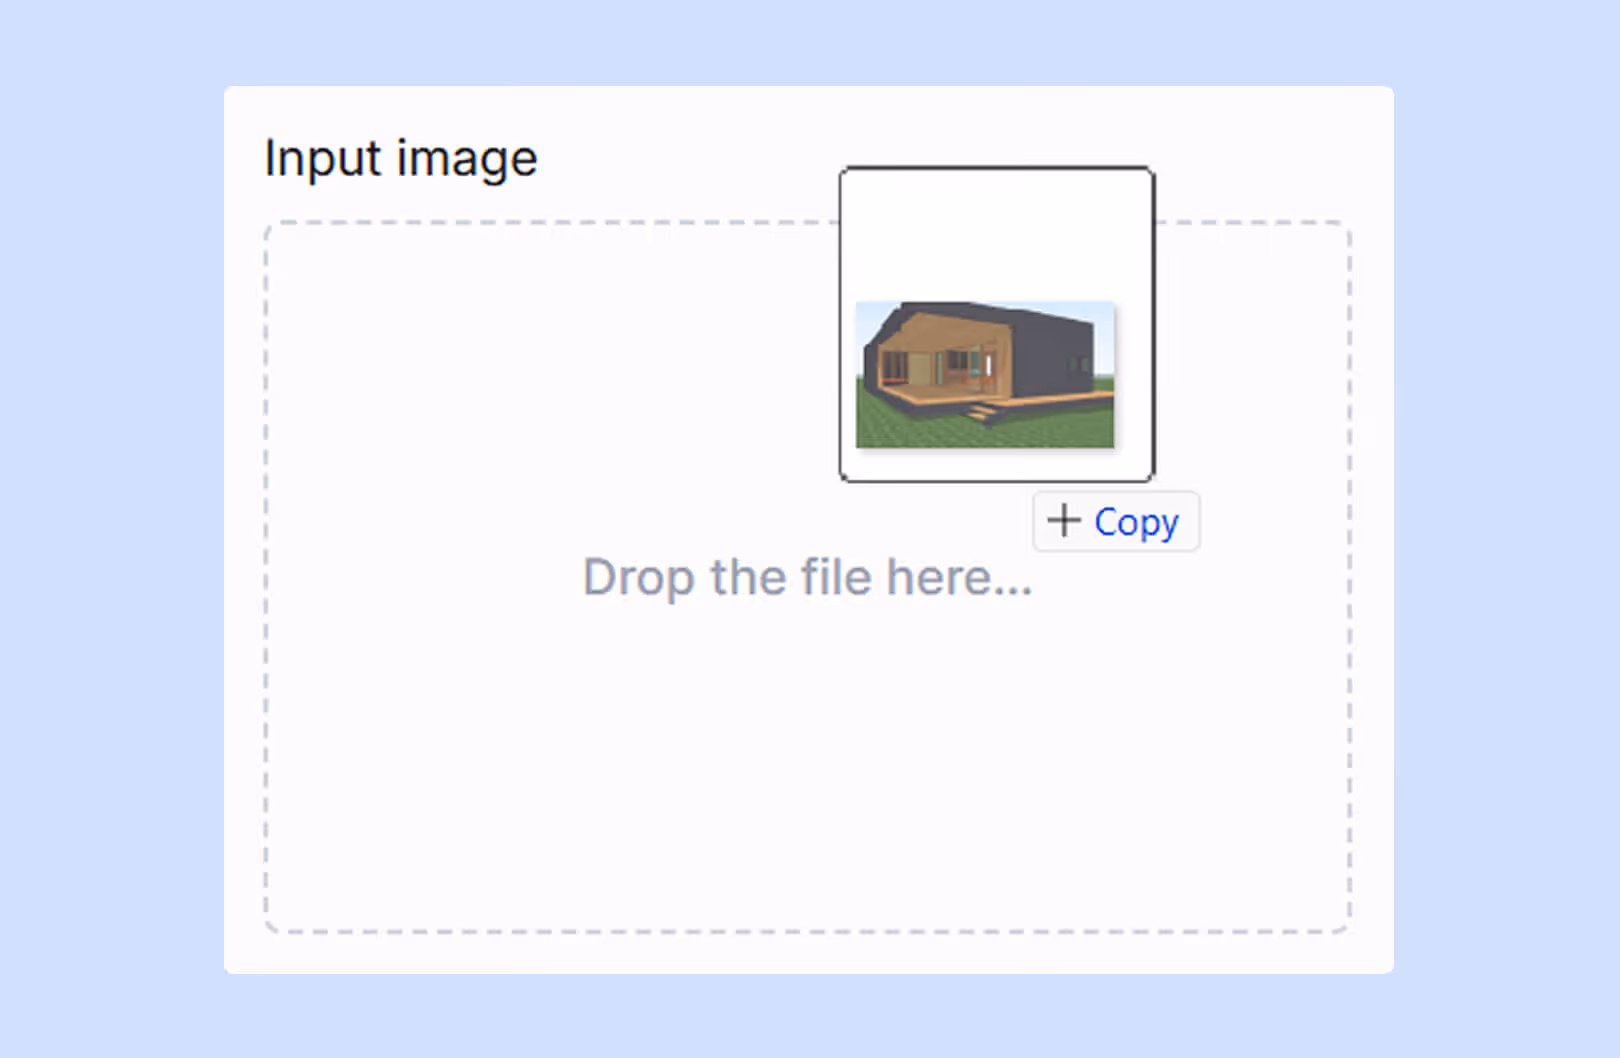
First, export your current 3D view from Revit. Go to File > Export > Images and Animations > Image. Save it as a PNG or JPEG - either works perfectly.
An insider tip: If you’re really short on time, even a screenshot will work—albeit not always with the best results. The pixels in the exported image are written “clean,” with no compression from your operating system or scaling from your monitor. That means it contains much more data for an AI tool to read, which translates to a better outcome.
Head to MyArchitectAI and sign up for a free account. Once you're in, simply drag and drop your Revit export or click to browse your files.
You'll see three engines:
.avif)
For most Revit projects, the Render engine is your go-to choice. It maintains the integrity of your BIM model while adding the visual polish clients expect.
Here's where it gets interesting. Instead of clicking through dozens of material libraries or adjusting countless light parameters, you simply describe what you want in plain English.
For example: "Modern residential house, black metal cladding, suburban area, sunny day" or "Minimalist residential bathroom with marble finishes and soft morning light."
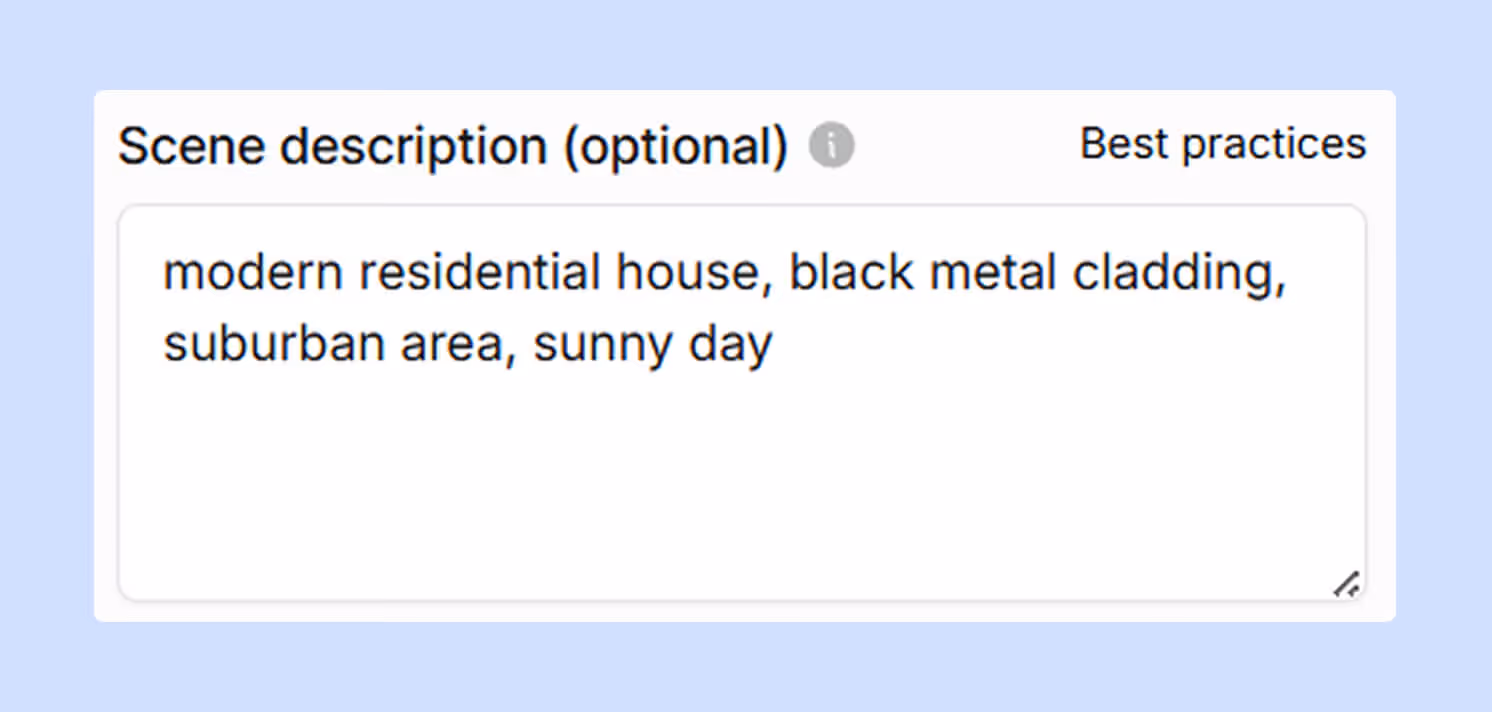
MyArchitectAI engine understands architectural language and automatically applies appropriate materials, effects, lighting, and atmosphere based on your description.
Click the "Generate" button and watch the magic happen. In 10-30 seconds, you'll have a photorealistic visualization that preserves the geometry of your Revit model. Should we even compare this to the hours spent on physically-based renderers?
Now, what happens when you need to swap those oak floors for polished concrete, or add pendant lights over the kitchen island—and how long does it take, even with the most optimized Revit render settings?
In MyArchitectAI, click the "Edit" button under your render and describe the changes in words. For example: "Make it dusk, soft window glow" or "Change the siding to bleached oak."
The AI makes these modifications in the blink of an eye. No need to go back to Revit, adjust materials, and re-render for hours.

Advantages of rendering your Revit models with AI tools:
MyArchitectAI essentially eliminates the traditional trade-off between speed and quality. You're not sacrificing visual impact for quick turnarounds anymore; on the contrary, you're getting both.
To see examples of Revit models transformed with MyArchitectAI, check out the gallery page.
Physically-based rendering engines simulate real-world light behavior for maximum realism.
These tools give you complete control over every aspect of your render, from individual light photons to microscopic material properties.
Popular options for Revit include V-Ray, Enscape, Lumion, and Twinmotion.
It’s all about using complex algorithms to trace light paths through your scene. When you hit render, the software:
These tools require extensive knowledge in all those fields to yield the best result: a realistic image that can fool the eye into thinking it's a photograph.
Most physically-based renderers follow this pattern:
Here's where things can get expensive. Physically-based renderers are resource-hungry:
Without proper hardware, you're looking at extremely long render times or crashes with complex scenes.
Running Revit on a Mac already requires workarounds, such as Parallels or Boot Camp. Rendering adds just another layer of complexity.
The built-in Revit renderer works fine through virtualization, though slower than native Windows. Something else poses a bigger problem here: many third-party renderers don't support Mac at all.
So, what are your best options for rendering Revit models on a Mac?
Pro tip: Skip GPU-heavy tools like V-Ray or Lumion unless you're running Windows natively through Boot Camp.
Whatever method you choose, here’s what will improve your results:
There’s no one-size-fits-all way to render in Revit. It all comes down to what you need.
If you’re just starting out, play around with Revit’s built-in renderer. It’s perfect for learning the basics and getting a feel for how materials, light, and settings work together.
When it’s time to impress clients, switch to an AI renderer. You’ll get polished, photorealistic visuals in minutes, without spending hours tweaking settings.
And if you’re tackling big, high-stakes projects, that’s when mastering a physically based renderer really pays off. It gives you the control and realism that clients (and your portfolio) will notice instantly.
For a larger list of rendering tools for Revit, check our other guide.
Happy rendering!

.webp)